
A successful WMS implementation for a third-party logistics (3PL) warehouse is not about features; it’s about getting the first invoice right. The plan must work backwards from each client’s rate card, defining every chargeable activity the floor must capture. This four-stage plan—Discover, Design and Configure, Validate, and Implement and Expand—is built for the multi-client reality where uncaptured work is never billed. How long a WMS implementation takes depends on your number of clients, items, sites, and integrations, so it is scoped with your team. This is not a generic software rollout; it is a commercial project to secure your revenue, one billable event at a time. For a full breakdown of the charging models this process supports, see the complete guide to 3PL billing.
Why a 3PL implementation is different
Most warehouse management systems are designed for a single company managing its own stock. A 3PL warehouse is different. You run a multi-tenant operation where several clients’ inventories share one floor, each with its own items, service levels, and commercial contract. This changes the entire focus of a WMS implementation.
One floor, many clients
In a 3PL, the system must enforce strict client segregation in WMS. A pallet belonging to Client A may sit next to Client B’s stock, but the WMS must maintain separate ownership, traceability, and billing rules. In India, the GST accounts and records rules require the owner or operator of a godown to store goods so that they can be identified “item wise and owner wise” (CBIC, rule 3(6)). Segregation is a compliance requirement as well as good practice.
The invoice is the product
For a single-company warehouse, the primary output is stock accuracy and fulfilment efficiency. For a 3PL, the most important output is a complete and correct invoice for each client. Your revenue depends on it. The system must translate every contracted service—receiving, storage, picking, packing, returns, and value-added work—into an auditable charge. This is a fundamental difference in project goals and explains how a 3PL WMS differs from a standard WMS.
Uncaptured work is unbilled revenue
A 3PL is paid by activity. If a team member performs a chargeable task like relabelling a pallet or handling an urgent order, but the system doesn't capture that event when it happens, the charge is often lost forever. Month-end reconciliation from memory and paperwork is a recipe for revenue leakage. A successful WMS implementation for a 3PL treats the system as a billable event tracking tool, writing a charge record the moment the work is done.
Stage 1: Discover
The first stage of a realistic WMS implementation isn't about software. It's about codifying your commercial agreements. You must build a complete map of what you do, for whom, and how you charge for it.
Collect every contract and rate card
Gather the signed master service agreements and all current rate cards for every client you plan to migrate. These documents are the source of truth for what you are entitled to bill. Do not rely on what you think the deal is; work from the signed paper.
Build a billable-activity map
Create a master list of every single chargeable activity, client by client. This is your billable-activity map. It should be exhaustive, covering everything from standard receiving and storage to exceptions like out-of-hours handling, returns processing, or applying a specific label. This map becomes the blueprint for your system configuration.
Document the unit of measure for every charge
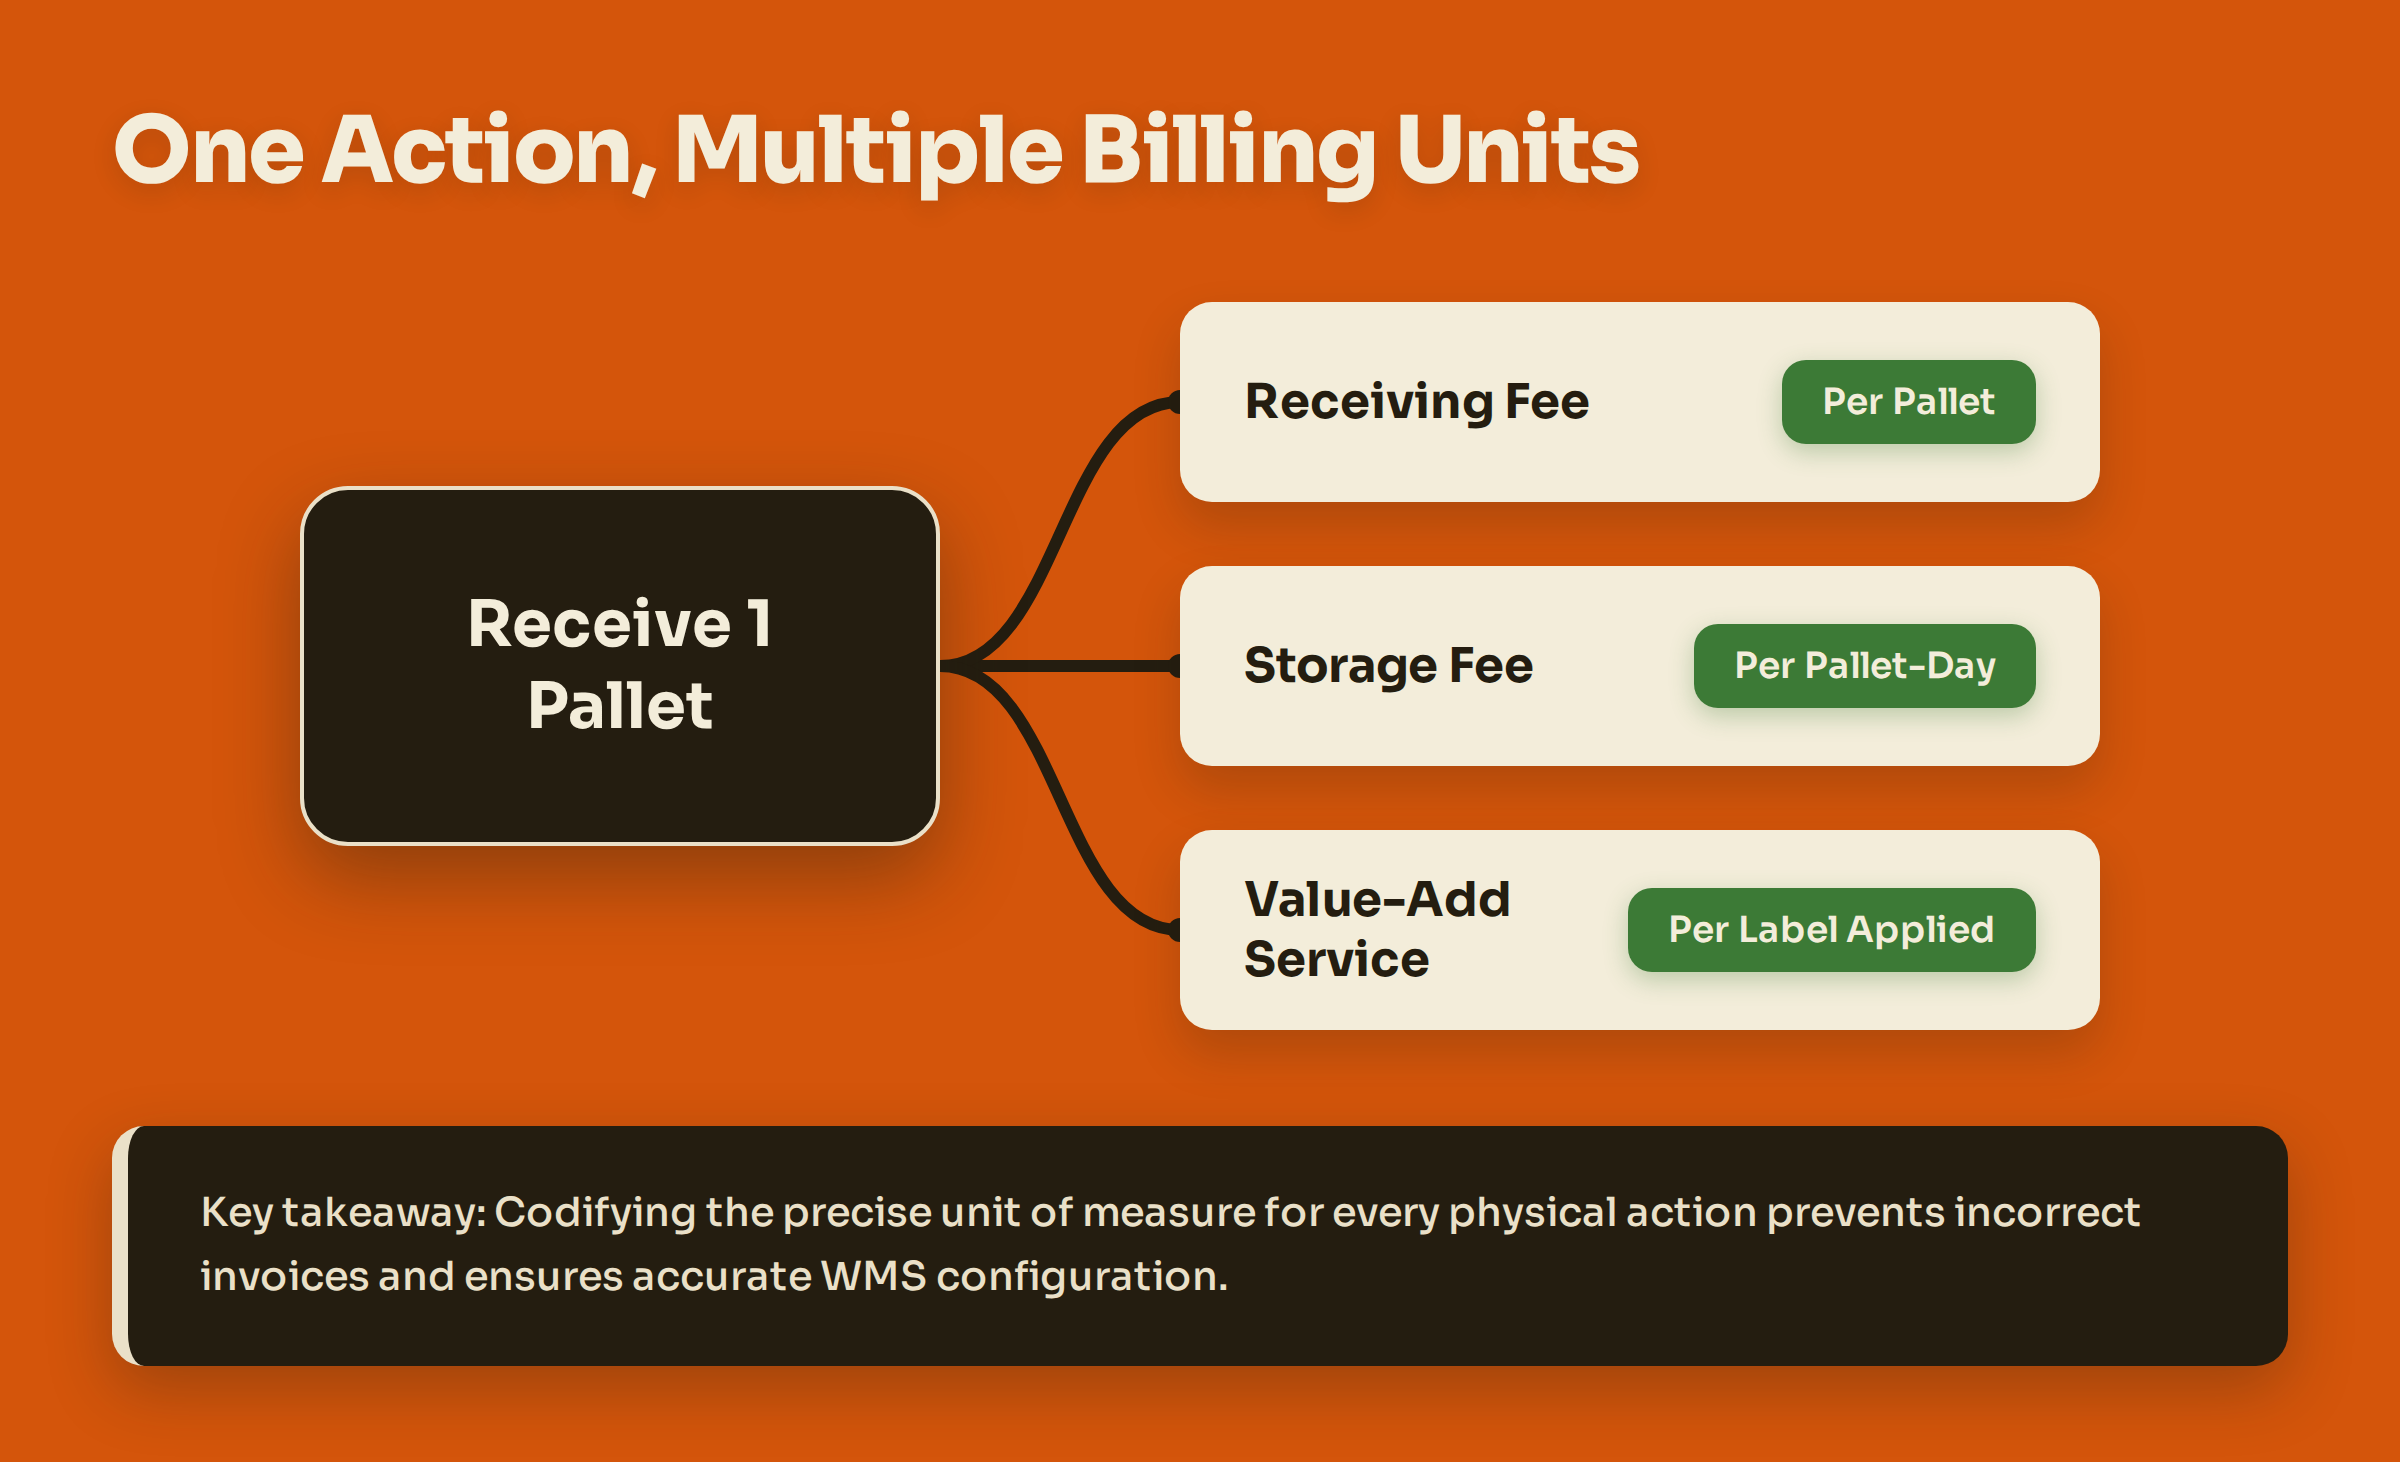
For each line on your billable-activity map, note the precise unit of measure. Do you charge for receiving by the pallet, the carton, the item, or the inbound order line? Is storage billed per pallet-day, per bin, or based on cubic metres? A single physical action, like receiving a pallet, might generate multiple charges with different units. Getting this wrong is a primary cause of incorrect invoices.
Gather client-specific item masters and stock levels
Finally, collect the data that describes what you store. For each client, you need their item master (SKUs, descriptions, barcodes, dimensions), current stock on hand, and a map of your physical warehouse locations. This data provides the baseline for your opening stock count and ensures the system reflects the physical reality of your operation.
Stage 2: Design and configure
With the billable-activity map as your guide, you can now configure the WMS to match your commercial and operational reality. This stage translates your contracts into system rules.
Enforce client segregation from day one
Set up each client as a distinct entity in the system. All inventory—every pallet, carton, and item—must be assigned to an owner. This ensures that stock for one client can never be accidentally picked for another and that all activity is correctly attributed for billing. This is the foundation of multi-client inventory management.
Clean item masters before you load them
Resist the temptation to dump raw client spreadsheets into the WMS. "Dirty" data—with duplicate SKUs, inconsistent units of measure, or missing dimensions—will cause errors in receiving, picking, and billing. Clean and validate each item master before migration. Do not migrate obsolete or dead items that are no longer stocked.
Map locations to the physical floor
Configure your warehouse layout in the system to mirror the physical reality of your aisles, racks, and bins. A clear location master is essential for efficient put-away, accurate picking, and effective cycle count scheduling. This process also helps identify any "unofficial" storage areas that need to be brought under system control.
Configure rate cards as billable events
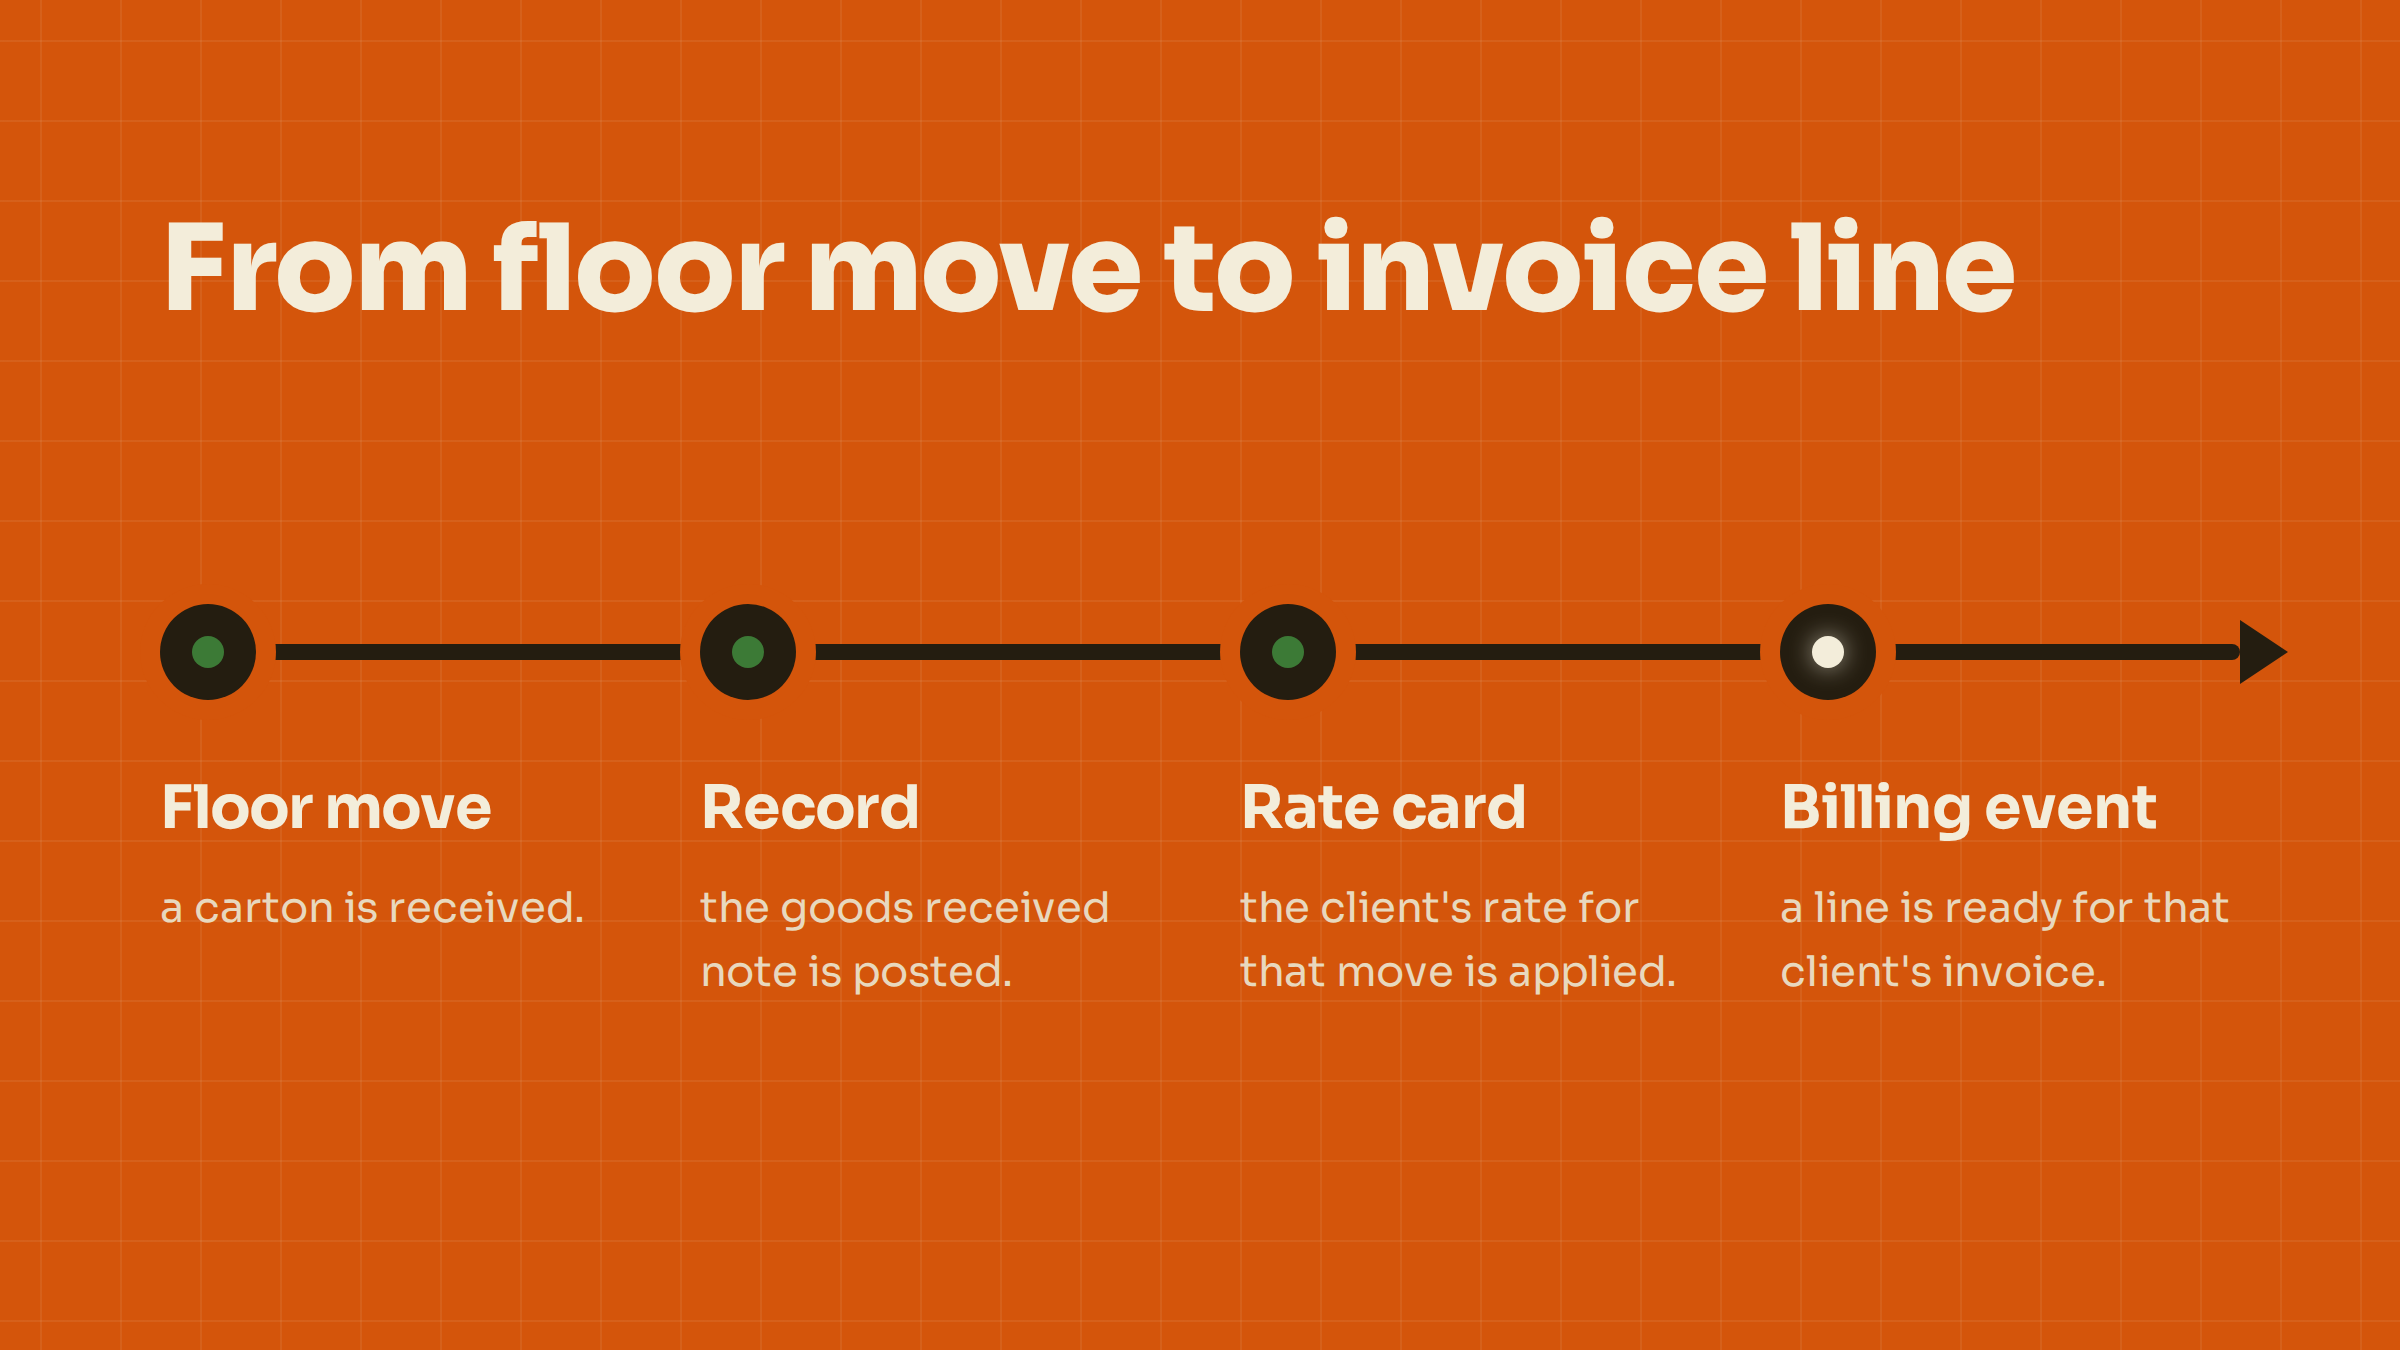
This is the core of a 3PL WMS implementation. Load each client's rate card not as a static price list, but as a set of rules that map operational events to charges. For every line on your billable-activity map, define the system trigger. For example:
- Event: GRN (Goods Received Note) is posted.
- Rule: If client is 'Client A', create a billable event for 'Receiving' at the per-carton rate in Client A's rate card.
Stage 3: Validate
Before you issue a single live invoice, you must prove the configuration is correct. The validation stage is your quality gate, confirming that the system accurately reflects both your physical inventory and your commercial agreements.
Count opening stock for each client
A full physical stocktake is non-negotiable. You must establish a trusted opening balance for every client, SKU, and location. This count becomes the baseline against which all future system transactions are measured. The process highlights the difference between ongoing cycle counts versus a stocktake, which serves as a hard reset of inventory records.
Run a parallel billing period
This is the single most critical test. For one full billing cycle, run your old process and the new WMS in parallel. Generate an invoice using your existing spreadsheets or manual methods, and generate another from the WMS based on the captured billable events.
Compare the two invoices line by line. Every single difference is an investigation. A discrepancy could be a configuration error in the new system that needs fixing. Or, it could be a charge your old process was missing—billable work you were doing for free. This is how a WMS helps with revenue leakage prevention. Identifying these gaps is a direct path to improving profitability and understanding true revenue leakage.

Train the floor team on capturing events
Your team on the warehouse floor is now your billing department. Train them not just on how to use the scanner, but on why each scan matters. They need to understand that a confirmed pick is a billable event, and a value-added service task must be recorded to be charged. Their discipline in capturing work as it happens is what makes the entire system work.
Stage 4: Implement and expand
With a validated configuration, you are ready to go live. The key is to start small, prove the process with a single client, and then expand methodically.
Go live with a single client or workflow
Do not attempt a "big bang" go-live with all clients at once. The risk is too high. Select one client—ideally one with a straightforward contract and a good working relationship—to go first. Focus on getting their receiving, storage, fulfilment, and billing perfect. This controlled launch minimizes disruption and allows your team to build confidence.
Issue the first invoice and walk the client through it
Generate the first live invoice directly from the WMS. Then, sit down with your client and walk them through it. Show them the invoice, the detailed activity report behind it, and how it ties back to their rate card. This transparency builds trust and proves the value of the new system. It turns the invoice from a source of dispute into a clear record of services rendered.
Add clients one by one
Once the first client is running smoothly, you can begin onboarding the others. Use the same proven methodology: validate their specific rate card, run a parallel billing test, and go live. The process gets faster with each client as your team masters the implementation framework. This is also the point where you can quantify the financial impact of your new, more accurate billing. Use our calculator to see what missed charges cost your business.
Mistakes that make go-lives slip
Many WMS projects fail to deliver on their promise because they ignore the commercial realities of a 3PL. Avoid these common pitfalls that cause delays, budget overruns, and failed go-lives.
Loading rate cards last
Treating billing as a finance task to be configured after the warehouse is "live" is the most common mistake. If the system isn't configured to capture billable events from day one, you are forced to manually reconstruct charges, defeating the purpose of the project.
Migrating messy item masters
Garbage in, garbage out. Loading unvalidated item data with duplicates and errors will corrupt your inventory and billing from the start. Data cleansing is a critical, non-negotiable step in the design phase.
Skipping the parallel billing run
It can be tempting to skip this step to save time. Don't. The parallel run is the only true end-to-end test of your entire configuration, from floor scan to final invoice. It is the acceptance test that proves the system is ready for production.
Treating billing as a month-end task
In a modern 3PL, billing is not a once-a-month accounting job. It is a continuous process where every move on the floor writes a potential line on an invoice. This is a core principle of storage billing automation.
Choosing a system from a feature list
Many 3PLs get distracted by long feature lists without asking the most important question: "Can this system bill my client contracts correctly?" Before you choose a WMS, understand what a small 3PL actually needs from a WMS, which starts and ends with accurate, automated billing.
Where Binsy fits
A 3PL needs more than just a warehouse management system; it needs a warehouse management and billing system designed for its specific business model. The alternatives—spreadsheets, a generic WMS, or billing reconstructed at month-end—make missed charges likely and month-end slow.
Built for multi-client billing
Binsy is the warehouse management and billing system for third-party, multi-client warehouses. It is built on the understanding that your business is paid by activity, client by client. Our system provides:
- Client-level segregation on a shared floor, so each client’s stock and activity are kept separate.
- A rate card per client, allowing you to configure the unique commercial terms of each contract.
- The ability to manage items and pallets side by side, reflecting how you store and handle goods.
- A billing event written as each move happens, creating an auditable trail of charges, so work is not lost before it is billed.
A practical implementation approach
Binsy, the FreighAI warehouse product, runs together with FreighAI today. Our approach to implementation mirrors the realistic plan laid out in this article. Implementation starts the same way every time: we scope the first workflow, integration requirements and implementation plan with your team. We focus on getting your first client live and billing correctly. See how it works.
Ready to stop leaking revenue and get paid for all the work you do? See your floor in Binsy.
Frequently Asked Questions
How long does a WMS implementation take?
There is no standard timeline for a WMS implementation because the scope is unique to each 3PL. The duration depends on the number of clients, the complexity of their rate cards, the number of SKUs, the number of warehouse sites, and the required integrations with other systems (for example with your clients' systems). A realistic plan is scoped with your team after an initial discovery phase.
What data do I need before starting a WMS implementation?
Before you begin, you need to gather all commercial and operational source documents. This includes signed client contracts and rate cards, a complete and clean item master for each client (SKUs, descriptions, dimensions), a list of all physical warehouse locations, and an accurate count of opening stock levels for each client.
Should we run parallel billing during a WMS implementation?
Yes, absolutely. A parallel billing run is the most critical validation step. By calculating invoices using both your old method and the new WMS for the same period, you can identify configuration errors, data issues, or—most importantly—revenue you were previously failing to capture. It is the final proof that your system is configured correctly before you go live.
Can we go live one client at a time?
Yes, and it is the recommended approach. Going live with a single, well-understood client first lowers risk and allows your team to master the new process in a controlled environment. Once that client is operating smoothly and their invoices are correct, you can use the same proven methodology to onboard your remaining clients one by one.
How does a 3PL WMS prevent revenue leakage?
A 3PL WMS prevents revenue leakage by treating every operational activity as a potential billable event. Instead of reconstructing charges from paperwork at the end of the month, the system is configured to automatically create a charge record the moment a service (like a special handling task, a rush order, or applying a label) is performed and scanned on the floor. If the work isn't captured when it happens, it's often never billed.
Sources & References
This article draws on research and data from the following verified sources:
From reading to the rack.
Bring one client's rate card and one month of invoices. We'll walk your flow through Binsy and show where the billing events would have written themselves.
Book a walkthrough